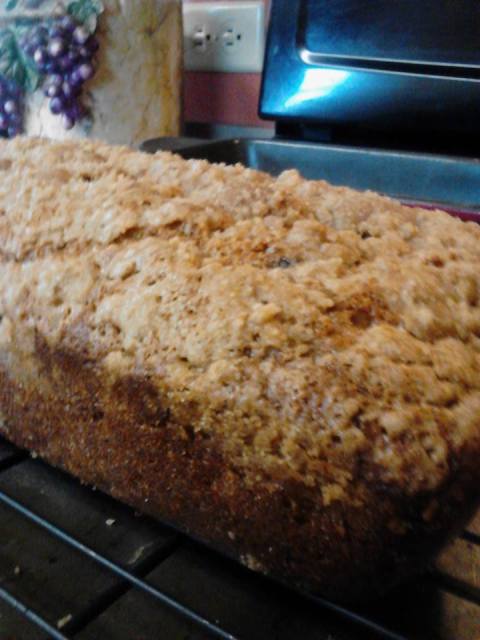
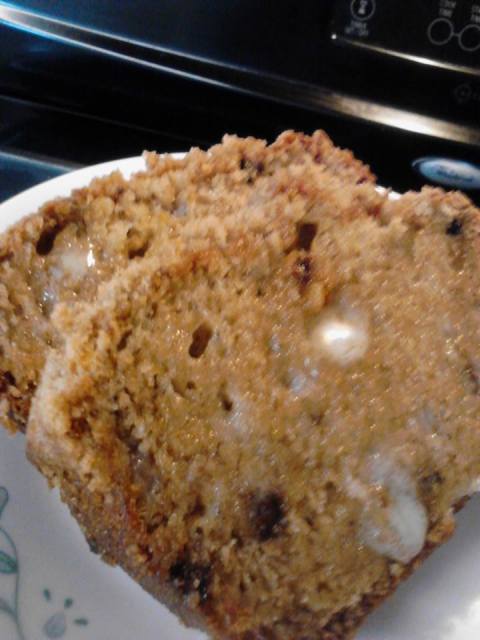
Streusel Topped Banana Bread
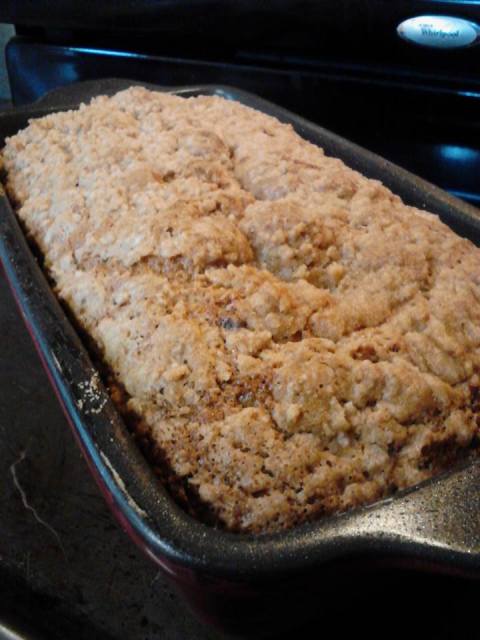
OOOH Banana Bread… who doesn’t LOVE that? Do you collect bananas in your freezer like we do? Today I noticed there were 5 and 5 is my magic number for banana bread. I have always used my Mom’s recipe (which is her Mom’s recipe – ect.) and have taken to adding chocolate chips to it for a bit more ‘sweetness’… BUT we had this easy streusel topping on another dish and just knew it would be MOST perfect on the banana bread! WOW – so amazingly delicious!! Took the bread to whole new level… YUMMMM!!! A couple pats of real butter and you have yourself a meal my friends!!!
This made one of those large loaf pans but sometimes I double the recipe and make 6 (or 7) of the mini loaves… Now there’s an idea… Maybe I need to make some more today!
Streusel Topped Banana Bread
Ingredients –
2 cups all-purpose flour
1 1/2 teaspoons baking powder
1/2 teaspoon baking soda
1/4 teaspoon salt
1/4 teaspoon ground cinnamon
1/8 teaspoon ground nutmeg
1 cup sugar
1 1/2 cups MASHED banana (about 5 medium)
2 eggs, beaten
1/2 cup cooking oil or melted butter or margarine
1/4 cup chopped nuts (walnuts or pecans) – optional
Streusel Top –
1/4 cup packed brown sugar
3 tablespoons all-purpose flour
2 tablespoons SOFT (not melted) butter
Directions –
Preheat oven to 350
Mix Dry Ingredients in a large bowl – flour, powder, soda, salt, cinnamon, nutmeg and sugar
Start a Wet Ingredient Bowl- Mash Bananas with a fork, dump into dry mix, Then beat eggs and add to dry mix, melt butter and also pour into main bowl…. Mix all ingredients until combined. (add chopped nuts if desired)
Pour into a prepared bread pan (I spray with PAM)
Mix Streusel Topping (brown sugar, flour, butter) until ‘crumbly’ and pour over top of mixture in baking pan
Bake for 40-45 minutes (for full size loaf)… I checked mine with a toothpick at 40 and went the full 45
Allow to sit for 5 minutes, then tip on side (you may need to use a knife along sides) to remove to finish cooling on a rack.
ENJOY!!
Sloppy Joes ~ Freezer and/or Camp Meal
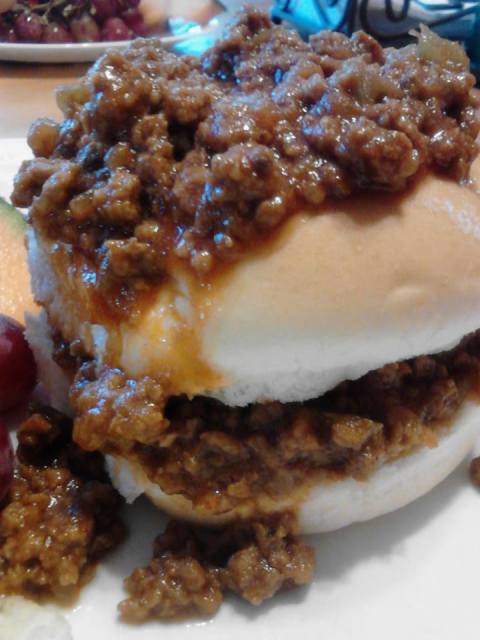
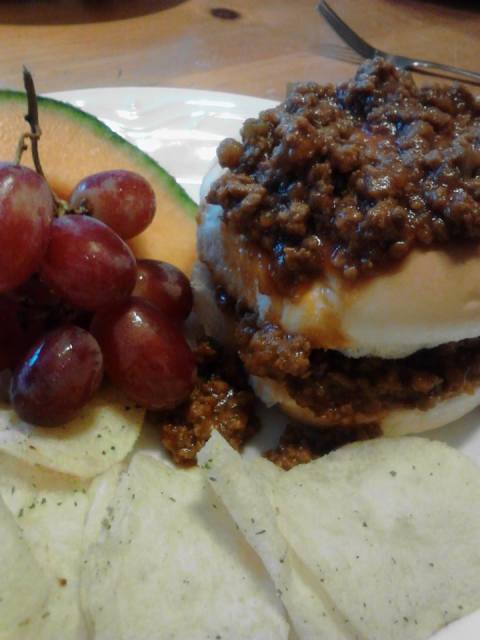
Want to know something… I LOVE sloppy joes! I don’t know what it is about them, but there is something so comforting and hearty and delicious about the beefy, saucy, yummy meat…. Whether you toast a roll or serve them on super soft hamburger buns (our favorite way)… I can never pass one up!
These are great with tator tots, fries or chips and/or sliced up fresh fruit AND we always like fresh veggies as a side for these sloppy joes!
This is a tried and true “gramma” recipe so you know it’s good…. Each batch makes about 6+ decent sandwiches so I often double the recipe so I can freeze half for a quick easy meal another night. This recipe is perfect for heating in the crock for a few hours and is always a favorite to come home to after a game night!
Also a favorite “CAMP” meal because the crock can sit and sammies can be made as wanted!
• As with many of “MY” recipes – this is a variation of a cook book recipe found online… Also, as usual, I tripled the original recipe and then cut in ½… because 1 lb of burger just can’t feed my brood – but a pound and a ½ is perfect!
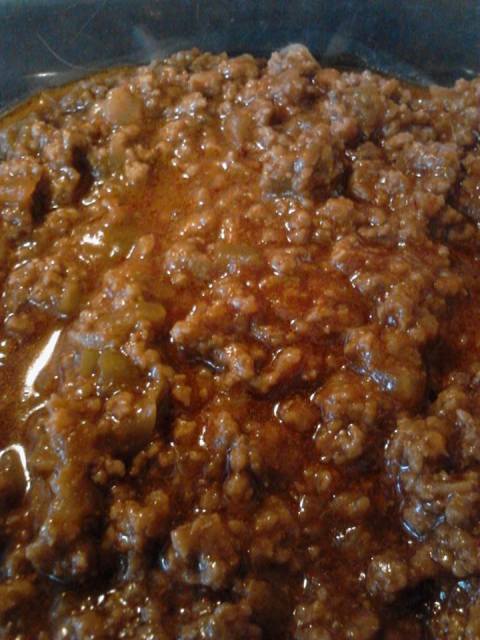
SLOPPY JOES –
1 and ½ lbs. ground beef
¾ cup diced onion
¾ cup diced green pepper
½ cup water
1 and ½ cups Ketchup
1 TBS beef bouillon
1 TBS Worcestershire sauce
1 TBS brown sugar
1 and 1/2 tsp mustard
Dice your peppers and onions… as big or as little as you want… feel free to throw other diced veggies in too – sometimes I add zucchini and/or squash and even carrots if I have some extra… I just like the ratio of 1.5 cups diced veggies to 1.5 lbs ground beef and the veggie mix has to include peppers and onions for the flavor!
Brown the beef with the peppers and onions… drain off the fat.
Add the water, ketchup, beef bouillon, Worcestershire, brown sugar and mustard – mix well.
(FREEZE to use later – thaw overnight)
Heat in Frying pan – then once hot – simmer for 20 minutes… or heat in a crock for a few hours!
Serve on buns – either crispy toasted or super soft…. No in between! ENJOY!!!!
Garlic Lime Chicken ~ BEST Freezer Meal

Garlic Lime Chicken… by far the most versatile dish we have discovered on this FREEZER MEAL journey that has become life!
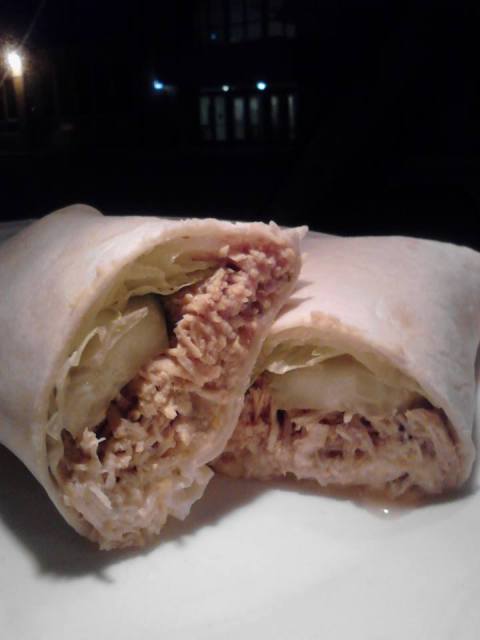
This chicken is perfect anyway you cook it… it started as a perfect grilled chicken (thaw and throw it on the grill), then a baked chicken (pan fry, crock pot it or throw in the oven then serve over rice with veggies – I also thicken the sauce)… and now I have begun cooking all day in the crock, then shredding it and using it for AMAZING wraps! Our favorite has become this shredded chicken with some jack cheese and diced up veggies – cucumbers are phenomenal – then drizzled with ranch! We have even taken to making double batches… we get a FULL sit down meal out of it, then have wraps for a quick dinner and THEN use the leftovers to make delicious quesadillas (another quickie meal for busy weeknights!)… entire family approved – 5 thumbs up – TRULY!!!!
Because I am on my 3rd week in a row of making a batch of this chicken (family demanded) I just knew I had to post it to share!
This is such a GREAT recipe to make ahead and freeze… Give it a try!
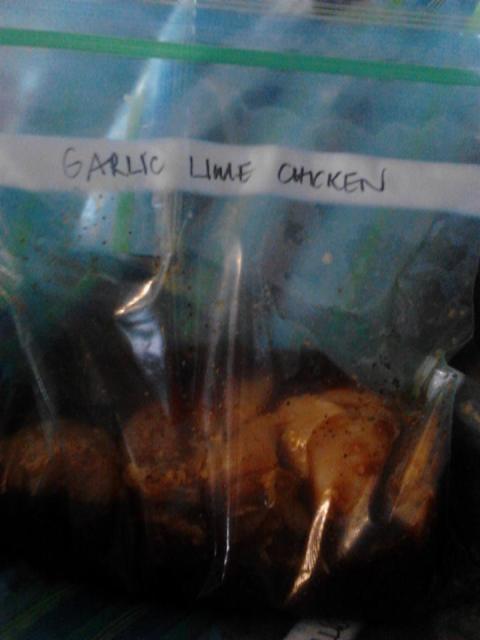
GARLIC LIME CHICKEN (Freezer Meal)
Ingredients:
- 2.5 lbs chicken breasts – trimmed and cut in 1/2
- 1/2 Cup Low Sodium Soy Sauce (MAKE SURE you use LOW SODIUM soy sauce – it makes a HUGE difference!)
- 1/4 Cup Lime Juice
- 1 TBS Worcestershire Sauce
- 2 TBS Minced Garlic
- 1/2 tsp Dry Mustard
- 1/2 tsp Ground Pepper
- 1/4 cup water
Instructions:
Everything into a freezer bag! Thaw 24 hours prior to cooking… OBVIOUSLY – you can just make and cook but a bit of marinating is better!
Preferred Cooking Method: Crockpot, 4-6 hours on high or 6-8 hours on low
You can serve the chicken as is (You may add cornstarch to remaining sauce to thicken and use as a “gravy/sauce”) – or OUR FAVORITE way to eat – Shred chicken, in crock, with 2 forks… stir around in juices…. And serve on wraps (ladle the chicken out with a slotted spoon) with diced cucumber, shredded cheese and ranch dressing!
TRY IT – TELL US WHAT YOU THINK!!!!!!!!!!!!!
Creamy White Chicken Chili
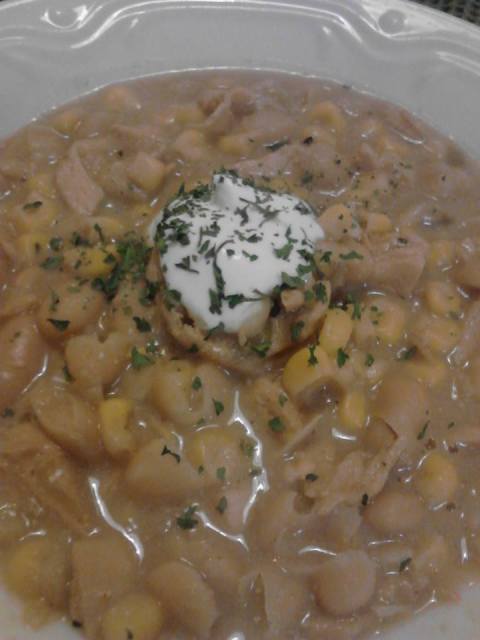
Creamy…white chicken chili… I had only heard about it – you know, saw it on menus, but never deviated enough from my standard order to try anything new… BUT then, it happened… someone with me ordered the WHITE CHICKEN CHILI!! The smell alone…wholly Moses! Spice and garlic and YUMMMM… so of course I had to taste test – you know in the name of truly caring about my friends and making sure their food is safe for consumption… OMG… that stuff was AMAZING!!!!!!!! I knew then and there – just as sure as that cup of soup would now be mine – I had to remake this recipe!
Regular Chili has always been a favorite in our house…. Click HERE for our favorite regular CHILI recipe… but sometimes we overdose a bit on the red sauce versions of things – and even though that statement is so far from the truth – having another chili (soup really) option is AWESOME!
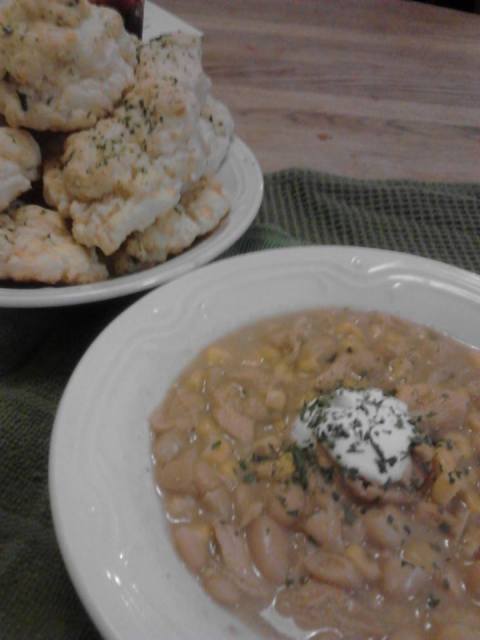
Go ahead – get this WHITE CHICKEN CHILI rolling, then make a batch of the Copy Cat Red Lobster (Cheddar Bay) biscuits to serve along with it… what a perfect combo!!
Creamy Crockpot White Chicken Chili
Serves: 4-6
Ingredients:
• 2 lbs. boneless skinless chicken breasts – *cooked and shredded = 3 cups
• 3 tablespoons butter
• 3 tablespoons flour
• 1 cup milk
• 4 cups broth – either from the carton or make with bouillon chicken base
• 1 1/2 teaspoons chili powder
• 1 teaspoon cumin
• 1/2 teaspoon onion powder
• 1 teaspoon garlic powder
• 1 can chopped green chiles (4.5 ounce size = ½ cup)
• 1 can corn, drained = 1 cup
• 2 cans white beans, drained = 2 cups (cannellini, white kidney, butter or great northern)
• 1/4 teaspoon pepper
• Salt to taste if needed
• 1/2 cup sour cream
Instructions:
*If you don’t have precooked shredded chicken in a twenty pound stash – SERIOUSLY, I know the CRAZY that I am – then go ahead and cook and shred your chicken… any cooking method will do but I generally cook up large amounts in my crockpot with a bit of garlic and season salt in a cup of broth for about 8 hours on low (overnight even). The meat will fall right apart and can easily be shredded with 2 forks. So set aside 3 cups of cooked, shredded chicken.
In a pan, melt the butter then whisk in the flour – stir constantly. Add the milk and mix well. At this point you can pour this “cream starter” into your crockpot (if you want to set it and forget it) – or continue in your soup pan (where you will need to stir regularly – but the soup will thicken quicker).
Add the broth and then the chili powder, cumin, onion powder, garlic powder, STIR REALLY WELL, and add the chicken, green chilies, corn and beans. At this point you could FREEZE this soup and then cook it another time.
Cook on low for 4-8 hours (It’s a broad range, but that is the beauty of it). Add salt to taste and just prior to serving, add the sour cream – either stir it all in, or just plop a dollop in each in bowl.
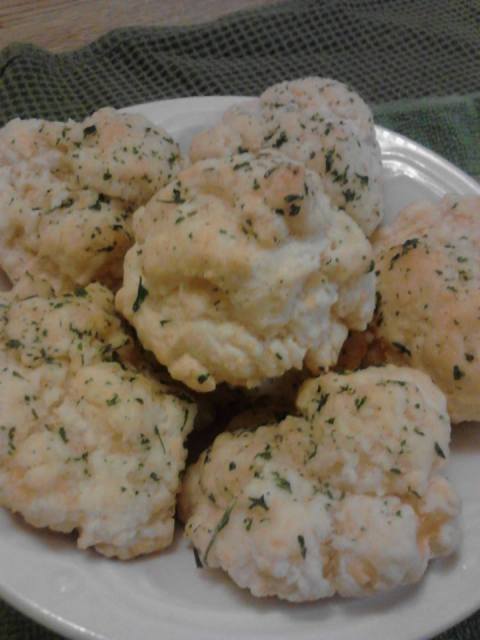
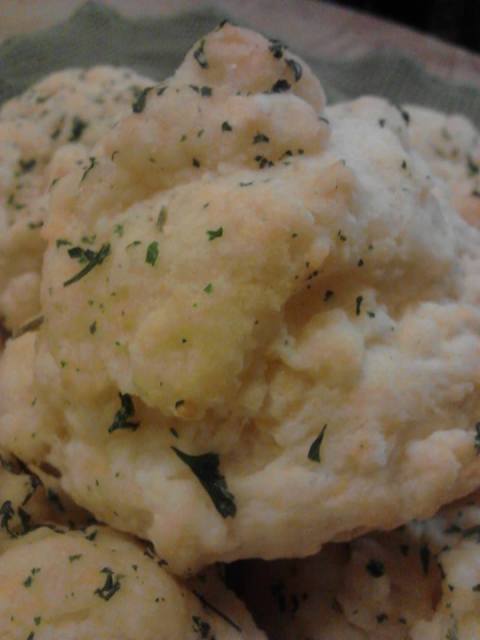
Cheddar Biscuits – Copy Cat of Red Lobster
FINALLY…. Amazing biscuits that SERIOUSLY taste even better than those scrumptious bites everyone loves from Red Lobster! These are so easy to throw together and were an amazing side to a hearty soup. We tried the few left for breakfast with sausage gravy and immediately had to make another batch!!
Go ahead, give them a try…. And tell me what you think!!
Cheddar Bay Biscuits – Copy Cat to Red Lobsters biscuits
Ingredients:
Biscuits –
2 and 1/2 cups Bisquick Mix
4 TBS cold butter – I used my shredder to “cut” the butter into the mix
1 and 1/2 cups cheddar cheese, shredded
3/4 cup milk
1/4 tsp garlic powder
Butter Topping –
3 TBS butter
1/2 tsp garlic powder
1/2 tsp dried parsley flakes
Instructions:
Preheat oven to 400 degrees. Lightly grease a cookie sheet.
In a mixing bowl, combine Bisquick with cold butter – like I mentioned, I use my shredder to “cut” the butter into the mix, then a fork to combine. Add cheddar cheese, milk, and garlic powder. Mix by hand until JUST combined – don’t over mix!
Drop 1/4 cup amounts of dough onto the cookie sheet. Makes 1 Dozen.
Bake for 11-13 minutes just until the tops of the biscuits begin to turn light brown.
Prepare the topping – melt remaining 3 TBS of butter and stir in garlic powder and dried parsley flakes.
After the biscuits come out of the oven, dab the garlic butter over the tops of all…..
Power Bites… Protein Balls… Healthy Dessert!
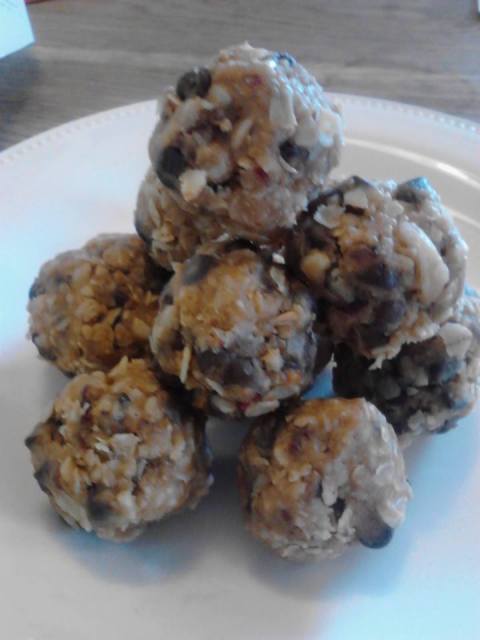
I have been attempting to come up with a YUMMY version of a “no- bake” protein bite… something I can throw together quickly and easily, something a bit healthier than a standard dessert… you know something I can “trick” my wrestler son into eating… but that everyone else will eat too! SCORE!! Everyone LOVED these – kids and adults alike!!
These bites are so delicious… almost a cross between cookie dough and fudge but without the added EXTRA sugar… I mean peanut butter and honey are quite sweet enough and once you add the “crunchies” and a bit of mini chocolate chips, AWESOMENESS is found!!
They are really quite adaptable… keep your ratios of wet ingredients to dry ingredients about 1:2 and try any combos you like… Here is how we did it….
Ingredients:
2/3 cup sweetened, shredded coconut – TOASTED
1/2 cup creamy peanut butter
1/3 cup honey
1 tsp vanilla
1 cup oats
1/2 cup ground almonds (or flax seed works here)
½ cup chopped Craisins (or raisins are fine)
6 TBS mini chocolate chips
Instructions:
Toast your coconut, very low heat, stir constantly until it browns… allow to cool (I ground mine more in the processor)
Mix peanut butter, honey and vanilla
In a separate bowl, mix the oats, ground almonds OR flaxseed, and cooled coconut
Add dry ingredients to the wet, stir until just mixed, add chocolate chips and stir again
Set in fridge for about 1 hour so it chills enough to harden a bit
Make 1/2” balls… Keep refrigerated
Sure hope you like them as much as we did! Let me know your variations!!!
‘Skinny’ Cheeseburger Casserole – aka: Goulash
‘Skinny’ Cheeseburger Casserole – aka: Goulash… an amazing QUICK, EASY, HEALTHY Freezer meal!
Read the rest of this entry
Cherry Almond Delights (Sour Cream SOFT frosted) Cookies

Cherry Almond Delights (Sour cream)
It’s that time…. Time to start the cookies!
I love to bake everyone’s favorites for the cookie trays and every year I try a few different recipes to see what can be added… well HERE is a keeper!
You know a cookie is a keeper when you eat one straight from the oven – before they are frosted – and your eyes roll back in your head…. And you actually contemplate NOT frosting them because they are that good already!

BUT, as we all know, frosting makes EVERYTHING better! I did cheat and use a container of Cream Cheese frosting… I whipped it with my mixer (did you know if you whip your frosting with your mixer you can almost double it) and added about 2 TBS of the reserved cherry juice…. It turned a beautiful pink and tasted delish!!!
Give these a try and let me know what you think!!
Cherry Almond Delights (Sour cream)
INGREDIENTS:
- 3 cups sifted all-purpose flour
- 1 tsp baking powder
- ½ tsp baking soda
- 1 cup butter – softened at room temperature
- 1 and ½ cups sugar
- 2 eggs
- 1 cup sour cream
- 1 tsp vanilla
- 1 small jar maraschino cherries – drained and chopped
- 1 cup roasted almond slivers – chopped
- Cream Cheese frosting
INSTRUCTIONS:
- Sift flour, powder and soda…. Set aside
- Beat butter, sugar and eggs until light and fluffy – medium speed
- Add sour cream and vanilla – beat on low
- Add Cherries and Almonds – continue beating on low
- Gradually beat in flour mixture until well combined
- Refrigerate 1 hour
- Preheat oven to 375 and lightly grease cookie sheets
- To Bake, drop by rounded teaspoonful, 2 inches apart, onto cookie sheets
- Bake 10 minutes, until just starting to brown on bottom…. Remove to wire rack to cool
- *Frost with cream cheese frosting of your choice… I bought a tub of frosting and added 2 TBS cherry juice to tint it pink… then used pink sprinkles…. Will use red and green for Christmas!
Chili ~ Freezer Meal, Meal Appeal

CHILI – it is totally a favorite in our house…. Whether you eat it as is… with sour cream and cheddar, scooped with Frito’s, or as a topping for grilled hot dogs… this is a versatile dish that you can adjust to your liking… my husband always puts chopped jalapenos in his… but as is, is just perfect for the kids and I!!
Give it a try and let me know what you think….

Chili – FREEZER MEAL
Ingredients:
2 lbs browned ground beef – I fry with minced garlic… drain – about 3 cups
1 cup diced onion
1 cup diced pepper
2 cans beans – I use one chili bean and 1 kidney bean
2 cups stewed/diced tomatoes – always in my freezer
3 cups sauce – any red sauce will do
1 cup/can rotel
1 packet chili seasoning
Instructions:
Everything into a freezer bag! Thaw 24 hours prior to cooking…
Cooks best in a crock pot for longer time on low…
~ Recommend 6-8 hours on low for ease BUT can be simmered on the stove top, watch and stir frequently!!
Taste test as you go… some like to add a TBS of sugar and others a TBS or 2 of HOT SAUCE or RED PEPPER FLAKES
Serving suggestions: Eat a heaping bowl with cheddar and sour cream… dipping either FRITO SCOOPS or Saltine crackers in it – OR serve up a grilled cheese or cheesy garlic bread.
We also love to make chili dogs…cover with cheese and broil!
Apple BBQ Pork Roast ~ Freezer Meal, Meal Appeal

During a recent MEAL APPEAL WORKSHOP (next one is November 21 – check it out), one of the freezer meals we made was an APPLE BBQ PORK ROAST… If you are looking for an ultimate comfort meal, this is it!
There has been amazing feedback about this dish… some have baked it – low and slow – in the oven, I always do it in the crockpot (working Mama you know) and I even had a friend slice it length wise and grill it…
As with all of the freezer meals, the idea was to throw everything in a freezer bag, then pull this dish and cook it up…

HERE my gorgeous friend Didi made the roast…. Check her out at Dishin’ with Didi – just LOVE her, she is such an inspiration to me!!

I am telling you… the SMELL, the TASTE… AMAZING!!! Have a go – let me know what you think!!!
Apple BBQ Pork Roast – FREEZER MEAL
Ingredients:
3 lb pork roast – I buy the 10 lb loins (BJs for about $20) and cut into 1/3’s
1 cup applesauce – of course I used my home made
1 cup BBQ sauce – partial to ‘slop’ type sauces with some Sweet Baby Rays added in…
2 TBS minced dried onion
Instructions:
Everything in a freezer bag… Thaw 24 hours prior to cooking…
Crock pot – low and slow…. 7-9 hours on low (this will be ‘shred-able’)
OR Bake in the oven – about 2 hours on 325…. Then slice!
Serving suggestions: Roasted root vegetables and rice or * our favorites *, ‘smashed’ (fried) potatoes and slivered green beans!!
NOTES: The USDA recommends that pork be cooked to an internal temperature of 145 degrees Fahrenheit. The federal agency says it is lowering the recommended safe cooking temperature for whole cuts of pork from 160 degrees to 145 degrees and adding a 3-minute rest time.
